The documentation you are viewing is for Dapr v1.4 which is an older version of Dapr. For up-to-date documentation, see the latest version.
How-To: Publish a message and subscribe to a topic
Introduction
Pub/Sub is a common pattern in a distributed system with many services that want to utilize decoupled, asynchronous messaging. Using Pub/Sub, you can enable scenarios where event consumers are decoupled from event producers.
Dapr provides an extensible Pub/Sub system with At-Least-Once guarantees, allowing developers to publish and subscribe to topics. Dapr provides components for pub/sub, that enable operators to use their preferred infrastructure, for example Redis Streams, Kafka, etc.
Content Types
When publishing a message, it’s important to specify the content type of the data being sent.
Unless specified, Dapr will assume text/plain. When using Dapr’s HTTP API, the content type can be set in a Content-Type header.
gRPC clients and SDKs have a dedicated content type parameter.
Step 1: Setup the Pub/Sub component
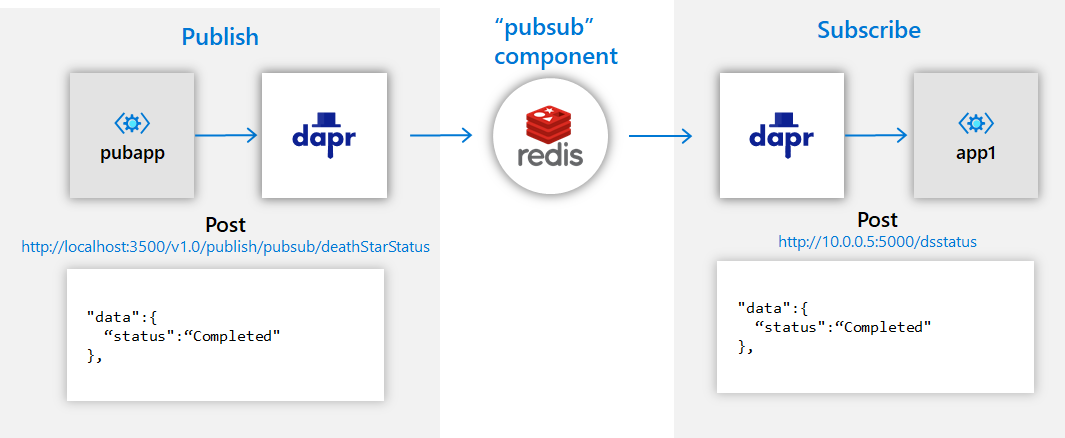
The following example creates applications to publish and subscribe to a topic called deathStarStatus.
The first step is to setup the Pub/Sub component:
Redis Streams is installed by default on a local machine when running dapr init.
Verify by opening your components file under %UserProfile%\.dapr\components\pubsub.yaml on Windows or ~/.dapr/components/pubsub.yaml on Linux/MacOS:
apiVersion: dapr.io/v1alpha1
kind: Component
metadata:
  name: pubsub
spec:
  type: pubsub.redis
  version: v1
  metadata:
  - name: redisHost
    value: localhost:6379
  - name: redisPassword
    value: ""
You can override this file with another Redis instance or another pubsub component by creating a components directory containing the file and using the flag --components-path with the dapr run CLI command.
To deploy this into a Kubernetes cluster, fill in the metadata connection details of your desired pubsub component in the yaml below, save as pubsub.yaml, and run kubectl apply -f pubsub.yaml.
apiVersion: dapr.io/v1alpha1
kind: Component
metadata:
  name: pubsub
  namespace: default
spec:
  type: pubsub.redis
  version: v1
  metadata:
  - name: redisHost
    value: localhost:6379
  - name: redisPassword
    value: ""
Step 2: Subscribe to topics
Dapr allows two methods by which you can subscribe to topics:
- Declaratively, where subscriptions are defined in an external file.
- Programmatically, where subscriptions are defined in user code.
Note
Both declarative and programmatic approaches support the same features. The declarative approach removes the Dapr dependency from your code and allows, for example, existing applications to subscribe to topics, without having to change code. The programmatic approach implements the subscription in your code.Declarative subscriptions
You can subscribe to a topic using the following Custom Resources Definition (CRD). Create a file named subscription.yaml and paste the following:
apiVersion: dapr.io/v1alpha1
kind: Subscription
metadata:
  name: myevent-subscription
spec:
  topic: deathStarStatus
  route: /dsstatus
  pubsubname: pubsub
scopes:
- app1
- app2
The example above shows an event subscription to topic deathStarStatus, for the pubsub component pubsub.
- The
routefield tells Dapr to send all topic messages to the/dsstatusendpoint in the app. - The
scopesfield enables this subscription for apps with IDsapp1andapp2.
Set the component with:
Place the CRD in your ./components directory. When Dapr starts up, it loads subscriptions along with components.
Note: By default, Dapr loads components from $HOME/.dapr/components on MacOS/Linux and %USERPROFILE%\.dapr\components on Windows.
You can also override the default directory by pointing the Dapr CLI to a components path:
dapr run --app-id myapp --components-path ./myComponents -- python3 app1.py
Note: If you place the subscription in a custom components path, make sure the Pub/Sub component is present also.
In Kubernetes, save the CRD to a file and apply it to the cluster:
kubectl apply -f subscription.yaml
Example
Create a file named app1.py and paste in the following:
import flask
from flask import request, jsonify
from flask_cors import CORS
import json
import sys

app = flask.Flask(__name__)
CORS(app)

@app.route('/dsstatus', methods=['POST'])
def ds_subscriber():
    print(request.json, flush=True)
    return json.dumps({'success':True}), 200, {'ContentType':'application/json'}

app.run()
After creating app1.py ensure flask and flask_cors are installed:
pip install flask
pip install flask_cors
Then run:
dapr --app-id app1 --app-port 5000 run python app1.py
After setting up the subscription above, download this javascript (Node > 4.16) into a app2.js file:
const express = require('express')
const bodyParser = require('body-parser')
const app = express()
app.use(bodyParser.json({ type: 'application/*+json' }));

const port = 3000

app.post('/dsstatus', (req, res) => {
    console.log(req.body);
    res.sendStatus(200);
});

app.listen(port, () => console.log(`consumer app listening on port ${port}!`))
Run this app with:
dapr --app-id app2 --app-port 3000 run node app2.js
Create a file named app1.php and paste in the following:
<?php

require_once __DIR__.'/vendor/autoload.php';

$app = \Dapr\App::create();
$app->post('/dsstatus', function(
    #[\Dapr\Attributes\FromBody]
    \Dapr\PubSub\CloudEvent $cloudEvent,
    \Psr\Log\LoggerInterface $logger
    ) {
        $logger->alert('Received event: {event}', ['event' => $cloudEvent]);
        return ['status' => 'SUCCESS'];
    }
);
$app->start();
After creating app1.php, and with the SDK installed,
go ahead and start the app:
dapr --app-id app1 --app-port 3000 run -- php -S 0.0.0.0:3000 app1.php
Programmatic subscriptions
To subscribe to topics, start a web server in the programming language of your choice and listen on the following GET endpoint: /dapr/subscribe.
The Dapr instance calls into your app at startup and expect a JSON response for the topic subscriptions with:
pubsubname: Which pub/sub component Dapr should use.topic: Which topic to subscribe to.route: Which endpoint for Dapr to call on when a message comes to that topic.
Example
import flask
from flask import request, jsonify
from flask_cors import CORS
import json
import sys

app = flask.Flask(__name__)
CORS(app)

@app.route('/dapr/subscribe', methods=['GET'])
def subscribe():
    subscriptions = [{'pubsubname': 'pubsub',
                      'topic': 'deathStarStatus',
                      'route': 'dsstatus'}]
    return jsonify(subscriptions)

@app.route('/dsstatus', methods=['POST'])
def ds_subscriber():
    print(request.json, flush=True)
    return json.dumps({'success':True}), 200, {'ContentType':'application/json'}
app.run()
After creating app1.py ensure flask and flask_cors are installed:
pip install flask
pip install flask_cors
Then run:
dapr --app-id app1 --app-port 5000 run python app1.py
const express = require('express')
const bodyParser = require('body-parser')
const app = express()
app.use(bodyParser.json({ type: 'application/*+json' }));

const port = 3000

app.get('/dapr/subscribe', (req, res) => {
    res.json([
        {
            pubsubname: "pubsub",
            topic: "deathStarStatus",
            route: "dsstatus"
        }
    ]);
})

app.post('/dsstatus', (req, res) => {
    console.log(req.body);
    res.sendStatus(200);
});

app.listen(port, () => console.log(`consumer app listening on port ${port}!`))
Run this app with:
dapr --app-id app2 --app-port 3000 run node app2.js
Update app1.php with the following:
<?php

require_once __DIR__.'/vendor/autoload.php';

$app = \Dapr\App::create(configure: fn(\DI\ContainerBuilder $builder) => $builder->addDefinitions(['dapr.subscriptions' => [
    new \Dapr\PubSub\Subscription(pubsubname: 'pubsub', topic: 'deathStarStatus', route: '/dsstatus'),
]]));
$app->post('/dsstatus', function(
    #[\Dapr\Attributes\FromBody]
    \Dapr\PubSub\CloudEvent $cloudEvent,
    \Psr\Log\LoggerInterface $logger
    ) {
        $logger->alert('Received event: {event}', ['event' => $cloudEvent]);
        return ['status' => 'SUCCESS'];
    }
);
$app->start();
Run this app with:
dapr --app-id app1 --app-port 3000 run -- php -S 0.0.0.0:3000 app1.php
The /dsstatus endpoint matches the route defined in the subscriptions and this is where Dapr will send all topic messages to.
Step 3: Publish a topic
To publish a topic you need to run an instance of a Dapr sidecar to use the pubsub Redis component. You can use the default Redis component installed into your local environment.
Start an instance of Dapr with an app-id called testpubsub:
dapr run --app-id testpubsub --dapr-http-port 3500
Then publish a message to the deathStarStatus topic:
dapr publish --publish-app-id testpubsub --pubsub pubsub --topic deathStarStatus --data '{"status": "completed"}'
Then publish a message to the deathStarStatus topic:
curl -X POST http://localhost:3500/v1.0/publish/pubsub/deathStarStatus -H "Content-Type: application/json" -d '{"status": "completed"}'
Then publish a message to the deathStarStatus topic:
Invoke-RestMethod -Method Post -ContentType 'application/json' -Body '{"status": "completed"}' -Uri 'http://localhost:3500/v1.0/publish/pubsub/deathStarStatus'
Dapr automatically wraps the user payload in a Cloud Events v1.0 compliant envelope, using Content-Type header value for datacontenttype attribute.
Step 4: ACK-ing a message
In order to tell Dapr that a message was processed successfully, return a 200 OK response. If Dapr receives any other return status code than 200, or if your app crashes, Dapr will attempt to redeliver the message following At-Least-Once semantics.
Example
@app.route('/dsstatus', methods=['POST'])
def ds_subscriber():
    print(request.json, flush=True)
    return json.dumps({'success':True}), 200, {'ContentType':'application/json'}
app.post('/dsstatus', (req, res) => {
    res.sendStatus(200);
});
Note on message redelivery
Some pubsub components (e.g. Redis) will redeliver a message if a response is not sent back within a specified time window. Make sure to configure metadata such asprocessingTimeout to customize this behavior. For more information refer to the respective component references.
(Optional) Step 5: Publishing a topic with code
If you prefer publishing a topic using code, here is an example.
const express = require('express');
const path = require('path');
const request = require('request');
const bodyParser = require('body-parser');

const app = express();
app.use(bodyParser.json());

const daprPort = process.env.DAPR_HTTP_PORT || 3500;
const daprUrl = `http://localhost:${daprPort}/v1.0`;
const port = 8080;
const pubsubName = 'pubsub';

app.post('/publish', (req, res) => {
  console.log("Publishing: ", req.body);
  const publishUrl = `${daprUrl}/publish/${pubsubName}/deathStarStatus`;
  request( { uri: publishUrl, method: 'POST', json: req.body } );
  res.sendStatus(200);
});

app.listen(process.env.PORT || port, () => console.log(`Listening on port ${port}!`));
If you prefer publishing a topic using code, here is an example.
<?php

require_once __DIR__.'/vendor/autoload.php';

$app = \Dapr\App::create();
$app->run(function(\DI\FactoryInterface $factory, \Psr\Log\LoggerInterface $logger) {
    $publisher = $factory->make(\Dapr\PubSub\Publish::class, ['pubsub' => 'pubsub']);
    $publisher->topic('deathStarStatus')->publish('operational');
    $logger->alert('published!');
});
You can save this to app2.php and while app1 is running in another terminal, execute:
dapr --app-id app2 run -- php app2.php
Sending a custom CloudEvent
Dapr automatically takes the data sent on the publish request and wraps it in a CloudEvent 1.0 envelope.
If you want to use your own custom CloudEvent, make sure to specify the content type as application/cloudevents+json.
Read about content types here, and about the Cloud Events message format.
Example
Publish a custom CloudEvent to the deathStarStatus topic:
dapr publish --publish-app-id testpubsub --pubsub pubsub --topic deathStarStatus --data '{"specversion" : "1.0", "type" : "com.dapr.cloudevent.sent", "source" : "testcloudeventspubsub", "subject" : "Cloud Events Test", "id" : "someCloudEventId", "time" : "2021-08-02T09:00:00Z", "datacontenttype" : "application/cloudevents+json", "data" : {"status": "completed"}}'
Publish a custom CloudEvent to the deathStarStatus topic:
curl -X POST http://localhost:3500/v1.0/publish/pubsub/deathStarStatus -H "Content-Type: application/cloudevents+json" -d '{"specversion" : "1.0", "type" : "com.dapr.cloudevent.sent", "source" : "testcloudeventspubsub", "subject" : "Cloud Events Test", "id" : "someCloudEventId", "time" : "2021-08-02T09:00:00Z", "datacontenttype" : "application/cloudevents+json", "data" : {"status": "completed"}}'
Publish a custom CloudEvent to the deathStarStatus topic:
Invoke-RestMethod -Method Post -ContentType 'application/cloudevents+json' -Body '{"specversion" : "1.0", "type" : "com.dapr.cloudevent.sent", "source" : "testcloudeventspubsub", "subject" : "Cloud Events Test", "id" : "someCloudEventId", "time" : "2021-08-02T09:00:00Z", "datacontenttype" : "application/cloudevents+json", "data" : {"status": "completed"}}' -Uri 'http://localhost:3500/v1.0/publish/pubsub/deathStarStatus'
Next steps
- Try the Pub/Sub tutorial sample
- Learn about PubSub routing
- Learn about topic scoping
- Learn about message time-to-live
- Learn how to configure Pub/Sub components with multiple namespaces
- List of pub/sub components
- Read the API reference
Feedback
Was this page helpful?
Glad to hear it! Please tell us how we can improve.
Sorry to hear that. Please tell us how we can improve.